![Featured Image for Docker SSL NGINX: ปรับแต่ง NGINX SSL configuration ให้ได้ A+ [ล่าสุด 2023]](https://coppers.io/th/docker-nginx-ssl-config/ssllabs_com-rating-featured_hu0a40f625f8616c97ed10d876ff5d4700_10217_640x0_resize_q80_h2_box_3.e8377ff7d4bb695d9dea246c5215c7bcccc7b37bb0eba11e9977d77edbdb0114.webp)
การปรับแต่ง NGINX SSL Configuration บน Docker container เพื่อให้เว็บไซต์ของเรามีความแข็งแรงและปลอดภัยมากยิ่งขึ้นด้วยคะแนน A+ จากเว็บไซต์ https://ssllabs.com
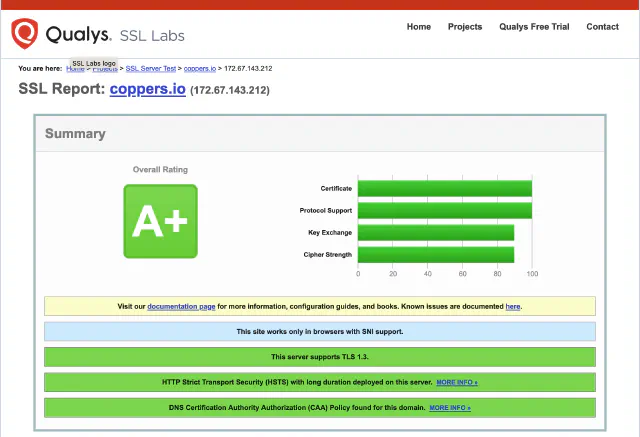
หลังจากที่เราได้ทำการติดตั้ง ssl certificate เพื่อเปิดใช้งาน HTTPS ไปแล้วในบทความที่ผ่านมา Docker Compose SSL: ติดตั้ง SSL certificate บน nginx container ต่อไปจะเป็นการปรับแต่ง nginx webserver เพื่อให้ได้คะแนน A+ ดังตัวอย่างจากเว็บไซต์ดังต่อไปนี้

Requirements
- SSL Certificates file (.crt or .pem) สำหรับเว็บไซต์ มีให้เลือกใช้งานหลากหลายตามความต้องการใช้งาน เช่น
Domain Validated (DV),Organization Validated (OV),Extended Validation (EV)และWildcard (WC) - Private Key file (.key)
- Docker Engine เพื่อให้ง่ายสำหรับการติดตั้ง
- Docker Compose command line tool
- Docker Images (nginx, php-fpm)
Docker NGINX SSL Config Project Layout
.nginx-docker/
|____docker-compose.yaml
|____nginx/
| |____nginx.conf
| |____ssl/
| | |____coppers_io.key
| | |____coppers_io.pem
| |____conf.d/
|   |____vhost-coppers_io.conf
|____public/
  |____index.php
ขั้นตอนการปรับแต่ง NGINX SSL configuration บน docker
1. ทำการ download docker images (nginx, php-fpm)
หลังที่ได้ทำการติดตั้ง docker-engine และ docker-compose เรียบร้อยแล้วให้ down load โดยใช้ command ดังนี้
$ docker pull nginx
$ docker pull php:7.2-fpm-alpine
2. สร้างไฟล์ docker-compose.yml เพื่อกำหนดค่าให้ container ต่างๆดังนี้
version: "2"
services:
  # Nginx webserver
  nginx:
    image: nginx:latest
    restart: always
    volumes:
      - ./nginx/nginx.conf:/etc/nginx.conf:ro
      - ./nginx/conf.d:/etc/nginx/conf.d:ro
      - ./nginx/ssl:/etc/nginx/ssl:ro
    ports:
      - "80:80"
      - "443:443"
    volumes_from:
      - php

  # PHP-FPM for compile .php file
  php:
    image: php:7.2-fpm-alpine
    restart: always
    volumes:
      - ./public:/var/www/html
3. สร้างไฟล์ nginx.conf สำหรับ NGINX Container
สำหรับการกำหนดค่าและปรับแต่ง nginx webserver ภายใต้ directory ./nginx/ ดังนี้
user  nginx;
worker_processes  1;

error_log  /var/log/nginx/error.log warn;
pid        /var/run/nginx.pid;

events {
  worker_connections  1024;
}

http {
  include       /etc/nginx/mime.types;
  default_type  application/octet-stream;
  log_format  main  '$remote_addr - $remote_user [$time_local] "$request" '
                    '$status $body_bytes_sent "$http_referer" '
                    '"$http_user_agent" "$http_x_forwarded_for"';
  access_log  /var/log/nginx/access.log  main;
  sendfile        on;
  #tcp_nopush     on;
  keepalive_timeout  65;
  client_max_body_size 10M;

  # SSL Settings
  ssl_protocols TLSv1.2 TLSv1.3;
  ssl_prefer_server_ciphers on;
  ssl_ciphers ECDHE-ECDSA-AES128-GCM-SHA256:ECDHE-RSA-AES128-GCM-SHA256:ECDHE-ECDSA-AES256-GCM-SHA384:ECDHE-RSA-AES256-GCM-SHA384:ECDHE-ECDSA-CHACHA20-POLY1305:ECDHE-RSA-CHACHA20-POLY1305:DHE-RSA-AES128-GCM-SHA256:DHE-RSA-AES256-GCM-SHA384;
  ssl_ecdh_curve secp384r1;
  ssl_buffer_size 4k;

  # Optimize session cache
  ssl_session_cache shared:SSL:10m;
  ssl_session_timeout 4h;

  # Enable session tickets
  ssl_session_tickets off;

  # OCSP Stapling
  ssl_stapling on;
  ssl_stapling_verify on;
  ssl_trusted_certificate /etc/nginx/ssl/trustchain.pem;
  resolver 8.8.8.8 8.8.4.4 valid=300s;
  resolver_timeout 5s;

  # Security headers
  add_header X-Frame-Options "SAMEORIGIN" always;
  add_header X-XSS-Protection "1; mode=block" always;
  add_header X-Content-Type-Options "nosniff" always;
  add_header Referrer-Policy "no-referrer-when-downgrade" always;
  add_header Content-Security-Policy "default-src * data: 'unsafe-eval' 'unsafe-inline'" always;
  # Enable HSTS
  add_header Strict-Transport-Security "max-age=31536000; includeSubDomains; preload" always;

  include /etc/nginx/conf.d/*.conf;
}
คำอธิบาย
กำหนดค่า SSL โดยการ enable เพียงแค่
TLSv1.2และTLSv1.3เท่านั้น และกำหนดในส่วนของ Ciphers เท่าที่ต้องการใช้งานเท่านั้นที่เหลือปิดให้หมดสำหรับใครที่ต้องการปรับแต่งหรือ Gen SSL Configuration สามารถดูข้อมูลเพิ่มเติมได้จาก SSL Configuration Generator
...
# SSL Settings
ssl_protocols TLSv1.2 TLSv1.3;
ssl_prefer_server_ciphers on;
ssl_ciphers ECDHE-ECDSA-AES128-GCM-SHA256:ECDHE-RSA-AES128-GCM-SHA256:ECDHE-ECDSA-AES256-GCM-SHA384:ECDHE-RSA-AES256-GCM-SHA384:ECDHE-ECDSA-CHACHA20-POLY1305:ECDHE-RSA-CHACHA20-POLY1305:DHE-RSA-AES128-GCM-SHA256:DHE-RSA-AES256-GCM-SHA384;
ssl_ecdh_curve secp384r1;
ssl_buffer_size 4k;
...
เปิดใช้งาน OCSP (Online Certificate Status Protocol) stapling เพื่อให้ nginx สามารถตรวจสอบสถานะ certificate จาก CA และส่ง status ให้กับ client พร้อม time stamp
...
# OCSP Stapling
ssl_stapling on;
ssl_stapling_verify on;
ssl_trusted_certificate /etc/nginx/ssl/trustchain.pem;
resolver 8.8.8.8 8.8.4.4 valid=300s;
resolver_timeout 5s;
...
เปิดใช้งาน HSTS (HTTP Strict Transport Security) เพื่อกำหนดให้ client ทำการ connect มาที่เว็บไซต์เราด้วย https เท่านั้น
...
# Enable HSTS
add_header Strict-Transport-Security "max-age=31536000; includeSubDomains; preload" always;
...
4. สร้างไฟล์ nginx vhost configuration
สำหรับเว็บไซต์ของเราไว้ใน directory ./nginx-docker/nginx/conf.d/ ตัวอย่างเช่น vhost-coppers_io.conf โดยมีข้อมูลดังนี้
server {
    listen 443 ssl http2 default_server;
    listen [::]:443 ssl http2 default_server;
    server_name coppers.io www.coppers.io;

    ssl_certificate /etc/nginx/ssl/coppers_io.pem;
    ssl_certificate_key /etc/nginx/ssl/coppers_io.key;

    root /var/www/html;
    index index.php index.html;

    location / {
        try_files $uri $uri/ /index.php?$args;
    }

    location ~ \.php {
        fastcgi_index index.php;
        fastcgi_pass php:9000;

        include fastcgi_params;
        fastcgi_split_path_info ^(.+\.php)(/.+)$;
        fastcgi_param PATH_INFO $fastcgi_path_info;
        fastcgi_param PATH_TRANSLATED $document_root$fastcgi_path_info;
        fastcgi_param SCRIPT_FILENAME $document_root$fastcgi_script_name;
    }
}

server {
    listen 80;
    listen [::]:80;
    server_name coppers.io www.coppers.io;
    return 301 https://www.coppers.io$request_uri;
}
5. ติดตั้ง ssl certificate ไฟล์
นำไฟล์ ssl certificate ที่ได้รับจาก SSL Providers/Reseller ไปวางไว้ใน directory ./nginx-docker/nginx/ssl/ ซึ่งจะเป็น location ที่อยู่บน docker-engine
6. ทำการ start container เพื่อทดสอบใช้งาน โดยใช้ docker-compose command
$ docker-compose up -d
7. ตรวจสอบสถานะปัจจุบันของ container ที่ได้ทำการ start ผ่าน docker-compose command ดังนี้
$ docker-compose ps
8. ตรวจสอบผลการ Nginx SSL configuration ของเราได้ที่ Qualys SSL Labs

